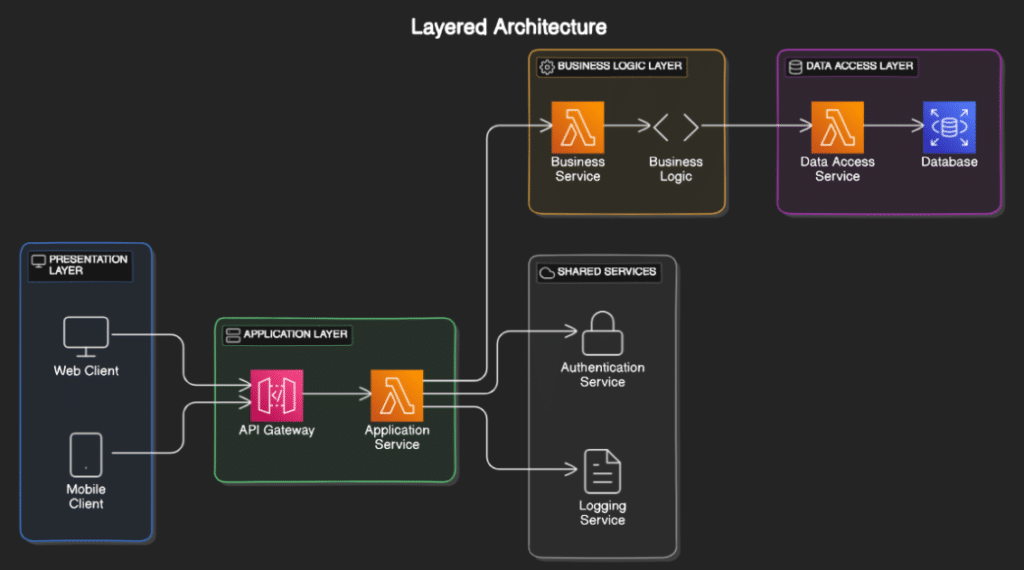
Layered Architecture, also known as N-tier architecture, is a design pattern that separates an application into distinct layers, each with specific responsibilities. This structure enhances maintainability, scalability, and testability. Common layers include the presentation layer, business logic layer, and data access layer.
In this tutorial, we will build a simple .NET Core application using a layered architecture.
Table of Contents
- Introduction to Layered Architecture
- Setting Up Your Development Environment
- Creating the Solution Structure
- Implementing the Data Access Layer (DAL)
- Implementing the Business Logic Layer (BLL)
- Implementing the Presentation Layer (API)
- Configuring Dependency Injection
- Testing and Debugging
- Conclusion
1. Introduction to Layered Architecture
Layered architecture separates concerns by dividing the application into layers, each with specific roles:
- Presentation Layer: Handles user interface and API requests.
- Business Logic Layer: Contains business rules and logic.
- Data Access Layer: Manages database operations.
2. Setting Up Your Development Environment
Ensure you have the following tools installed:
- .NET Core SDK
- Visual Studio or Visual Studio Code
3. Creating the Solution Structure
We will create a solution with three projects: API, BLL, and DAL.
- Create the Solution and Projects: Open your terminal or command prompt and run:
mkdir LayeredArchitectureApp
cd LayeredArchitectureApp
dotnet new sln

dotnet new webapi -o Api
dotnet new classlib -o BLL
dotnet new classlib -o DAL

dotnet sln add Api/Api.csproj
dotnet sln add BLL/BLL.csproj
dotnet sln add DAL/DAL.csproj
2. Add Project References:Add references to ensure the projects can communicate:
dotnet add Api/Api.csproj reference BLL/BLL.csproj
dotnet add BLL/BLL.csproj reference DAL/DAL.csproj
4. Implementing the Data Access Layer (DAL)
The DAL handles database operations and data retrieval.
- Define Models and DbContext: In the
DALproject, create aModelsfolder and add aProduct.csfile:
namespace DAL.Models
{
    public class Product
    {
        public int Id { get; set; }
        public string Name { get; set; }
        public decimal Price { get; set; }
    }
}
2. Add Entity Framework Core Packages: In the DAL project, add EF Core packages:
using Microsoft.EntityFrameworkCore;

namespace DAL
{
    public class DataContext : DbContext
    {
        public DataContext(DbContextOptions<DataContext> options) : base(options) { }

        public DbSet<Models.Product> Products { get; set; }
    }
}
3. Create Repository: Create a Repositories folder in the DAL project and add a ProductRepository.cs file:
using System.Collections.Generic;
using System.Linq;
using DAL.Models;
using Microsoft.EntityFrameworkCore;

namespace DAL.Repositories
{
    public class ProductRepository
    {
        private readonly DataContext _context;

        public ProductRepository(DataContext context)
        {
            _context = context;
        }

        public IEnumerable<Product> GetAll()
        {
            return _context.Products.ToList();
        }

        public Product GetById(int id)
        {
            return _context.Products.Find(id);
        }

        public void Add(Product product)
        {
            _context.Products.Add(product);
            _context.SaveChanges();
        }

        public void Update(Product product)
        {
            _context.Entry(product).State = EntityState.Modified;
            _context.SaveChanges();
        }

        public void Delete(int id)
        {
            var product = _context.Products.Find(id);
            if (product != null)
            {
                _context.Products.Remove(product);
                _context.SaveChanges();
            }
        }
    }
}
5. Implementing the Business Logic Layer (BLL)
The BLL contains the business rules and logic.
- Create Service Classes: In the
BLLproject, create aServicesfolder and add aProductService.csfile:
using System.Collections.Generic;
using DAL.Models;
using DAL.Repositories;

namespace BLL.Services
{
    public class ProductService
    {
        private readonly ProductRepository _productRepository;

        public ProductService(ProductRepository productRepository)
        {
            _productRepository = productRepository;
        }

        public IEnumerable<Product> GetAllProducts()
        {
            return _productRepository.GetAll();
        }

        public Product GetProductById(int id)
        {
            return _productRepository.GetById(id);
        }

        public void AddProduct(Product product)
        {
            _productRepository.Add(product);
        }

        public void UpdateProduct(Product product)
        {
            _productRepository.Update(product);
        }

        public void DeleteProduct(int id)
        {
            _productRepository.Delete(id);
        }
    }
}
6. Implementing the Presentation Layer (API)
The API layer handles incoming HTTP requests and sends responses.
- Create API Controllers: In the
Apiproject, create aControllersfolder and add aProductsController.csfile:
using System.Collections.Generic;
using BLL.Services;
using DAL.Models;
using Microsoft.AspNetCore.Mvc;

namespace Api.Controllers
{
    [Route("api/[controller]")]
    [ApiController]
    public class ProductsController : ControllerBase
    {
        private readonly ProductService _productService;

        public ProductsController(ProductService productService)
        {
            _productService = productService;
        }

        [HttpGet]
        public ActionResult<IEnumerable<Product>> GetProducts()
        {
            return Ok(_productService.GetAllProducts());
        }

        [HttpGet("{id}")]
        public ActionResult<Product> GetProduct(int id)
        {
            var product = _productService.GetProductById(id);
            if (product == null)
            {
                return NotFound();
            }
            return Ok(product);
        }

        [HttpPost]
        public ActionResult<Product> AddProduct([FromBody] Product product)
        {
            _productService.AddProduct(product);
            return CreatedAtAction(nameof(GetProduct), new { id = product.Id }, product);
        }

        [HttpPut("{id}")]
        public IActionResult UpdateProduct(int id, [FromBody] Product product)
        {
            if (id != product.Id)
            {
                return BadRequest();
            }
            _productService.UpdateProduct(product);
            return NoContent();
        }

        [HttpDelete("{id}")]
        public IActionResult DeleteProduct(int id)
        {
            _productService.DeleteProduct(id);
            return NoContent();
        }
    }
}
7. Configuring Dependency Injection
Configure dependency injection to ensure that services and repositories are properly instantiated.
- Configure Services in
Startup.cs: ModifyStartup.csin theApiproject:
using BLL.Services;
using DAL;
using DAL.Repositories;
using Microsoft.AspNetCore.Builder;
using Microsoft.AspNetCore.Hosting;
using Microsoft.EntityFrameworkCore;
using Microsoft.Extensions.Configuration;
using Microsoft.Extensions.DependencyInjection;
using Microsoft.Extensions.Hosting;

namespace Api
{
    public class Startup
    {
        public Startup(IConfiguration configuration)
        {
            Configuration = configuration;
        }

        public IConfiguration Configuration { get; }

        public void ConfigureServices(IServiceCollection services)
        {
            services.AddDbContext<DataContext>(options =>
                options.UseSqlServer(Configuration.GetConnectionString("DefaultConnection")));

            services.AddScoped<ProductRepository>();
            services.AddScoped<ProductService>();

            services.AddControllers();
        }

        public void Configure(IApplicationBuilder app, IWebHostEnvironment env)
        {
            if (env.IsDevelopment())
            {
                app.UseDeveloperExceptionPage();
            }

            app.UseHttpsRedirection();
            app.UseRouting();
            app.UseAuthorization();
            app.UseEndpoints(endpoints =>
            {
                endpoints.MapControllers();
            });
        }
    }
}
2. Add Connection String to appsettings.json: Add a connection string to the Api project’s appsettings.json file:
{
  "ConnectionStrings": {
    "DefaultConnection": "Server=(localdb)\\mssqllocaldb;Database=LayeredArchitectureDB;Trusted_Connection=True;MultipleActiveResultSets=true"
  },
  "Logging": {
    "LogLevel": {
      "Default": "Information",
      "Microsoft": "Warning",
      "Microsoft.Hosting.Lifetime": "Information"
    }
  },
  "AllowedHosts": "*"
}
8. Testing and Debugging
Test the entire application to ensure all layers interact correctly.
- Run Migrations and Update Database: Apply migrations to set up the database schema:
dotnet ef migrations add InitialCreate -p DAL -s Api
dotnet ef database update -p DAL -s Api
2. Test API Endpoints: Run the API project and use tools like Postman or Swagger to test the endpoints.
9. Conclusion
Implementing Layered Architecture in .NET Core promotes separation of concerns, maintainability, and scalability. By following this tutorial, you have built a multi-layered application with distinct presentation, business logic, and data access layers.