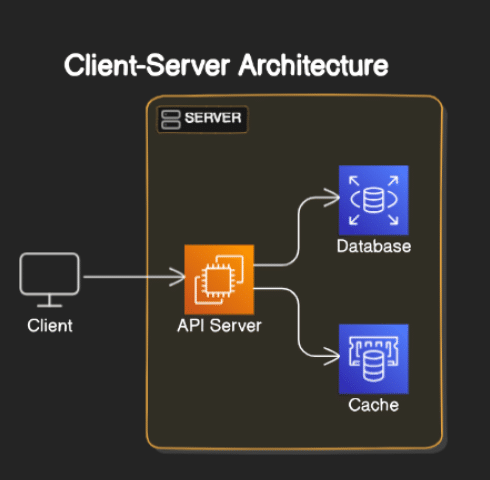
Client-Server Architecture is a foundational model in networked applications where the client requests resources or services and the server provides them. In this tutorial, we’ll walk through creating a client-server application using .NET Core. The server will host APIs, while the client will consume these APIs.
Table of Contents
- Introduction to Client-Server Architecture
- Setting Up Your Development Environment
- Creating the Server Project
- Building the Server APIs
- Creating the Client Project
- Consuming APIs from the Client
- Implementing Communication and Error Handling
- Securing Your Client-Server Application
- Testing and Debugging
- Deploying Your Application
- Conclusion
1. Introduction to Client-Server Architecture
In Client-Server Architecture, the client initiates requests for resources or services, and the server responds to these requests. The server is responsible for managing data, processing requests, and enforcing security, while the client focuses on the user interface and interaction.
2. Setting Up Your Development Environment
Ensure you have the following tools installed:
- .NET Core SDK
- Visual Studio or Visual Studio Code
- Postman (for testing APIs)
- Docker (optional, for containerization)
3. Creating the Server Project
We’ll create a .NET Core Web API project to act as the server.
- Create the Server Project: Open your terminal or command prompt and run:
mkdir ClientServerApp
cd ClientServerApp
dotnet new sln

dotnet new webapi -o Server
dotnet sln add Server/Server.csproj
2. Set Up the Server: Open the Server project in your IDE. This will be the backend that provides APIs to the client.
4. Building the Server APIs
We’ll create basic APIs to handle CRUD operations for a resource (e.g., Product).
- Define the Product Model: In the
Serverproject, create aModelsfolder and add aProduct.csfile:
namespace Server.Models
{
    public class Product
    {
        public int Id { get; set; }
        public string Name { get; set; }
        public decimal Price { get; set; }
    }
}
2. Create the Products Controller: Add a Controllers folder and create a ProductsController.cs file:
using Microsoft.AspNetCore.Mvc;
using Server.Models;
using System.Collections.Generic;
using System.Linq;

namespace Server.Controllers
{
    [ApiController]
    [Route("api/[controller]")]
    public class ProductsController : ControllerBase
    {
        private static List<Product> products = new List<Product>
        {
            new Product { Id = 1, Name = "Product1", Price = 10.0M },
            new Product { Id = 2, Name = "Product2", Price = 20.0M }
        };

        [HttpGet]
        public ActionResult<IEnumerable<Product>> Get()
        {
            return Ok(products);
        }

        [HttpGet("{id}")]
        public ActionResult<Product> Get(int id)
        {
            var product = products.FirstOrDefault(p => p.Id == id);
            if (product == null)
            {
                return NotFound();
            }
            return Ok(product);
        }

        [HttpPost]
        public ActionResult<Product> Post(Product product)
        {
            product.Id = products.Count + 1;
            products.Add(product);
            return CreatedAtAction(nameof(Get), new { id = product.Id }, product);
        }

        [HttpPut("{id}")]
        public IActionResult Put(int id, Product product)
        {
            var existingProduct = products.FirstOrDefault(p => p.Id == id);
            if (existingProduct == null)
            {
                return NotFound();
            }
            existingProduct.Name = product.Name;
            existingProduct.Price = product.Price;
            return NoContent();
        }

        [HttpDelete("{id}")]
        public IActionResult Delete(int id)
        {
            var product = products.FirstOrDefault(p => p.Id == id);
            if (product == null)
            {
                return NotFound();
            }
            products.Remove(product);
            return NoContent();
        }
    }
}
5. Creating the Client Project
We’ll create a .NET Core Console application to act as the client.
- Create the Client Project: In your terminal or command prompt, run:
dotnet new console -o Client
dotnet sln add Client/Client.csproj
2. Add HttpClient: The HttpClient will be used to communicate with the server’s APIs. In Client/Program.cs, add:
using System;
using System.Net.Http;
using System.Text.Json;
using System.Threading.Tasks;

namespace Client
{
    class Program
    {
        private static readonly HttpClient client = new HttpClient();

        static async Task Main(string[] args)
        {
            client.BaseAddress = new Uri("https://localhost:5001/api/");
            await GetProducts();
            await GetProduct(1);
            await PostProduct(new Product { Name = "Product3", Price = 30.0M });
            await PutProduct(1, new Product { Name = "UpdatedProduct1", Price = 15.0M });
            await DeleteProduct(2);
        }

        static async Task GetProducts()
        {
            var response = await client.GetAsync("products");
            response.EnsureSuccessStatusCode();
            var responseBody = await response.Content.ReadAsStringAsync();
            Console.WriteLine("Products: " + responseBody);
        }

        static async Task GetProduct(int id)
        {
            var response = await client.GetAsync($"products/{id}");
            response.EnsureSuccessStatusCode();
            var responseBody = await response.Content.ReadAsStringAsync();
            Console.WriteLine($"Product {id}: " + responseBody);
        }

        static async Task PostProduct(Product product)
        {
            var json = JsonSerializer.Serialize(product);
            var content = new StringContent(json, System.Text.Encoding.UTF8, "application/json");
            var response = await client.PostAsync("products", content);
            response.EnsureSuccessStatusCode();
            var responseBody = await response.Content.ReadAsStringAsync();
            Console.WriteLine("Product Created: " + responseBody);
        }

        static async Task PutProduct(int id, Product product)
        {
            var json = JsonSerializer.Serialize(product);
            var content = new StringContent(json, System.Text.Encoding.UTF8, "application/json");
            var response = await client.PutAsync($"products/{id}", content);
            response.EnsureSuccessStatusCode();
            Console.WriteLine("Product Updated");
        }

        static async Task DeleteProduct(int id)
        {
            var response = await client.DeleteAsync($"products/{id}");
            response.EnsureSuccessStatusCode();
            Console.WriteLine("Product Deleted");
        }
    }

    public class Product
    {
        public int Id { get; set; }
        public string Name { get; set; }
        public decimal Price { get; set; }
    }
}
6. Implementing Communication and Error Handling
Ensure your client handles errors and manages communication properly.
- Handle Errors in the Client: Update your client methods to include error handling:
static async Task GetProducts()
{
    try
    {
        var response = await client.GetAsync("products");
        response.EnsureSuccessStatusCode();
        var responseBody = await response.Content.ReadAsStringAsync();
        Console.WriteLine("Products: " + responseBody);
    }
    catch (HttpRequestException e)
    {
        Console.WriteLine($"Request error: {e.Message}");
    }
}
2. Logging and Exception Handling in the Server: Use middleware or exception filters to log errors:
public void Configure(IApplicationBuilder app, IWebHostEnvironment env)
{
    app.UseExceptionHandler("/Home/Error");
    app.UseHsts();

    app.UseHttpsRedirection();
    app.UseStaticFiles();

    app.UseRouting();
    app.UseAuthorization();

    app.UseEndpoints(endpoints =>
    {
        endpoints.MapControllers();
    });
}
7. Securing Your Client-Server Application
Implement security features to protect data and access.
- Add Authentication to the Server: Install the necessary NuGet package:
dotnet add package Microsoft.AspNetCore.Authentication.JwtBearerConfigure JWT authentication in Startup.cs:
public void ConfigureServices(IServiceCollection services)
{
    services.AddControllers();
    services.AddAuthentication(JwtBearerDefaults.AuthenticationScheme)
        .AddJwtBearer(options =>
        {
            options.TokenValidationParameters = new TokenValidationParameters
            {
                ValidateIssuer = true,
                ValidateAudience = true,
                ValidateLifetime = true,
                ValidateIssuerSigningKey = true,
                ValidIssuer = Configuration["Jwt:Issuer"],
                ValidAudience = Configuration["Jwt:Issuer"],
                IssuerSigningKey = new SymmetricSecurityKey(Encoding.UTF8.GetBytes(Configuration["Jwt:Key"]))
            };
        });
}
2. Secure API Endpoints: Apply the [Authorize] attribute to controllers or actions that require authentication:
[ApiController]
[Route("api/[controller]")]
[Authorize]
public class ProductsController : ControllerBase
{
    // API methods
}
3. Add JWT Token Generation: Create a controller to handle user authentication and JWT generation:
[ApiController]
[Route("api/[controller]")]
public class AuthController : ControllerBase
{
    private readonly IConfiguration _configuration;

    public AuthController(IConfiguration configuration)
    {
        _configuration = configuration;
    }

    [HttpPost("token")]
    public IActionResult GetToken([FromBody] LoginModel login)
    {
        if (login.Username == "user" && login.Password == "password")
        {
            var claims = new[]
            {
                new Claim(JwtRegisteredClaimNames.Sub, login.Username),
                new Claim(JwtRegisteredClaimNames.Jti, Guid.NewGuid().ToString())
            };

            var key = new SymmetricSecurityKey(Encoding.UTF8.GetBytes(_configuration["Jwt:Key"]));
            var creds = new SigningCredentials(key, SecurityAlgorithms.HmacSha256);

            var token = new JwtSecurityToken(
                issuer: _configuration["Jwt:Issuer"],
                audience: _configuration["Jwt:Issuer"],
                claims: claims,
                expires: DateTime.Now.AddMinutes(30),
                signingCredentials: creds);

            return Ok(new
            {
                Token = new JwtSecurityTokenHandler().WriteToken(token)
            });
        }
        return Unauthorized();
    }
}

public class LoginModel
{
    public string Username { get; set; }
    public string Password { get; set; }
}
8. Testing and Debugging
Test the entire flow from client requests to server responses.
- Use Postman to Test API Endpoints:Test all CRUD operations by sending requests to the server APIs. Verify that the client can interact with the server correctly.
- Run the Client Application:Start the
Serverproject and ensure it’s running. Then, run theClientapplication and verify it correctly interacts with the server APIs.
9. Deploying Your Application
Deploy both client and server applications to a hosting environment.
- Dockerize the Server and Client (optional):Create
Dockerfilefor each project, then build and run Docker images. - Deploy to Cloud Services:Use cloud services like Azure, AWS, or any other provider to deploy your client-server applications.
10. Conclusion
Implementing Client-Server Architecture in .NET Core involves setting up a server to handle requests and a client to consume these services. By following this tutorial, you have created a simple yet functional client-server application, with considerations for security, error handling, and deployment.