he Saga Pattern is a microservices design pattern that ensures data consistency across multiple services in a distributed system. It is particularly useful for managing long-running transactions and maintaining eventual consistency. This pattern breaks down a large transaction into smaller, isolated steps, each with its own compensation action to revert changes if necessary.
In this tutorial, we will implement the Saga Pattern in a .NET Core application. We will create a distributed transaction across multiple microservices and manage the process using the Saga Pattern.
Table of Contents
- Introduction to the Saga Pattern
- Setting Up the Development Environment
- Creating the Microservices
- Implementing the Saga Coordinator
- Implementing the Microservices with Saga Steps
- Handling Compensation Actions
- Testing the Saga
- Conclusion
1. Introduction to the Saga Pattern
The Saga Pattern manages distributed transactions by breaking them into smaller sub-transactions, each with its own commit and rollback actions. There are two types of Saga implementations:
- Choreography: Each service performs a local transaction and publishes an event to trigger the next step.
- Orchestration: A central coordinator service manages the entire transaction process.
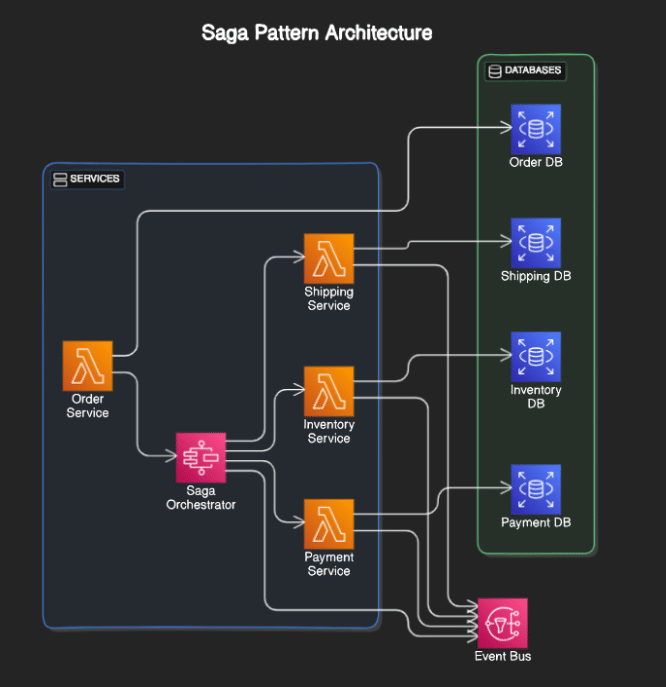
In this tutorial, we will use the Orchestration-based Saga Pattern.
2. Setting Up the Development Environment
Ensure you have the following tools installed:
- .NET Core SDK
- Visual Studio or Visual Studio Code
- RabbitMQ (for message brokering)
3. Creating the Microservices
We will create three microservices for this example: OrderService, PaymentService, and InventoryService.
- Create the Solution and Projects: Open your terminal or command prompt and run:
mkdir SagaPatternApp
cd SagaPatternApp
dotnet new sln

dotnet new webapi -o OrderService
dotnet new webapi -o PaymentService
dotnet new webapi -o InventoryService

dotnet sln add OrderService/OrderService.csproj
dotnet sln add PaymentService/PaymentService.csproj
dotnet sln add InventoryService/InventoryService.csproj
2. Add Common Dependencies: In each project, add the RabbitMQ client package:
dotnet add OrderService/OrderService.csproj package RabbitMQ.Client
dotnet add PaymentService/PaymentService.csproj package RabbitMQ.Client
dotnet add InventoryService/InventoryService.csproj package RabbitMQ.Client
4. Implementing the Saga Coordinator
The Saga Coordinator manages the transaction workflow.
- Create the Coordinator Project:
dotnet new console -o SagaCoordinator
dotnet sln add SagaCoordinator/SagaCoordinator.csproj
dotnet add SagaCoordinator/SagaCoordinator.csproj package RabbitMQ.Client
2. Implement the Coordinator:In the SagaCoordinator project, add a SagaCoordinator.cs file:
using System;
using RabbitMQ.Client;
using RabbitMQ.Client.Events;
using System.Text;

namespace SagaCoordinator
{
    class Program
    {
        static void Main(string[] args)
        {
            var factory = new ConnectionFactory() { HostName = "localhost" };
            using (var connection = factory.CreateConnection())
            using (var channel = connection.CreateModel())
            {
                channel.QueueDeclare(queue: "order_queue", durable: false, exclusive: false, autoDelete: false, arguments: null);

                var consumer = new EventingBasicConsumer(channel);
                consumer.Received += (model, ea) =>
                {
                    var body = ea.Body.ToArray();
                    var message = Encoding.UTF8.GetString(body);
                    Console.WriteLine(" [x] Received {0}", message);

                    // Process the order message and coordinate the saga
                    // Example: Send messages to PaymentService and InventoryService
                };
                channel.BasicConsume(queue: "order_queue", autoAck: true, consumer: consumer);

                Console.WriteLine(" Press [enter] to exit.");
                Console.ReadLine();
            }
        }
    }
}
5. Implementing the Microservices with Saga Steps
Each microservice will perform its part of the transaction and communicate with the Saga Coordinator.
- OrderService:
- Add Order Model:
namespace OrderService.Models
{
    public class Order
    {
        public int Id { get; set; }
        public string Product { get; set; }
        public int Quantity { get; set; }
        public decimal Price { get; set; }
    }
}- Add OrderController:
using Microsoft.AspNetCore.Mvc;
using RabbitMQ.Client;
using System.Text;

namespace OrderService.Controllers
{
    [Route("api/[controller]")]
    [ApiController]
    public class OrderController : ControllerBase
    {
        [HttpPost]
        public IActionResult CreateOrder([FromBody] Models.Order order)
        {
            var factory = new ConnectionFactory() { HostName = "localhost" };
            using (var connection = factory.CreateConnection())
            using (var channel = connection.CreateModel())
            {
                channel.QueueDeclare(queue: "order_queue", durable: false, exclusive: false, autoDelete: false, arguments: null);

                var message = Newtonsoft.Json.JsonConvert.SerializeObject(order);
                var body = Encoding.UTF8.GetBytes(message);

                channel.BasicPublish(exchange: "", routingKey: "order_queue", basicProperties: null, body: body);
                Console.WriteLine(" [x] Sent {0}", message);
            }

            return Ok(order);
        }
    }
}- PaymentService:
- Add PaymentController:
using Microsoft.AspNetCore.Mvc;
using RabbitMQ.Client;
using RabbitMQ.Client.Events;
using System.Text;

namespace PaymentService.Controllers
{
    [Route("api/[controller]")]
    [ApiController]
    public class PaymentController : ControllerBase
    {
        public PaymentController()
        {
            var factory = new ConnectionFactory() { HostName = "localhost" };
            using (var connection = factory.CreateConnection())
            using (var channel = connection.CreateModel())
            {
                channel.QueueDeclare(queue: "order_queue", durable: false, exclusive: false, autoDelete: false, arguments: null);

                var consumer = new EventingBasicConsumer(channel);
                consumer.Received += (model, ea) =>
                {
                    var body = ea.Body.ToArray();
                    var message = Encoding.UTF8.GetString(body);
                    Console.WriteLine(" [x] Received {0}", message);

                    // Process payment here
                };
                channel.BasicConsume(queue: "order_queue", autoAck: true, consumer: consumer);
            }
        }
    }
}- InventoryService:
- Add InventoryController:
using Microsoft.AspNetCore.Mvc;
using RabbitMQ.Client;
using RabbitMQ.Client.Events;
using System.Text;

namespace InventoryService.Controllers
{
    [Route("api/[controller]")]
    [ApiController]
    public class InventoryController : ControllerBase
    {
        public InventoryController()
        {
            var factory = new ConnectionFactory() { HostName = "localhost" };
            using (var connection = factory.CreateConnection())
            using (var channel = connection.CreateModel())
            {
                channel.QueueDeclare(queue: "order_queue", durable: false, exclusive: false, autoDelete: false, arguments: null);

                var consumer = new EventingBasicConsumer(channel);
                consumer.Received += (model, ea) =>
                {
                    var body = ea.Body.ToArray();
                    var message = Encoding.UTF8.GetString(body);
                    Console.WriteLine(" [x] Received {0}", message);

                    // Update inventory here
                };
                channel.BasicConsume(queue: "order_queue", autoAck: true, consumer: consumer);
            }
        }
    }
}
6. Handling Compensation Actions
Compensation actions are necessary to roll back changes if a step in the saga fails.
- Define Compensation Logic:
- PaymentService Compensation:
// Add compensation logic in PaymentService to refund payment if needed2. InventoryService Compensation:
// Add compensation logic in InventoryService to revert inventory changes if needed7. Testing the Saga
Test the saga workflow to ensure that all steps are correctly coordinated and compensation actions are executed when necessary.
- Run All Microservices and the Coordinator: Start the
OrderService,PaymentService,InventoryService, andSagaCoordinator. - Create a New Order: Use tools like Postman to send a request to the
OrderServiceand observe the transaction flow.
8. Conclusion
Implementing the Saga Pattern in .NET Core ensures data consistency and manages distributed transactions efficiently. By following this tutorial, you have created a distributed system with multiple microservices coordinated using the Saga Pattern, including handling compensation actions.