Microservices architecture is a powerful approach to building scalable and maintainable applications. In this tutorial, we will walk you through the process of developing an application using the microservices architecture pattern in .NET Core. This guide is designed to be engaging and informative, making it easy for both beginners and experienced developers to follow along.
Table of Contents
- Introduction to Microservices Architecture
- Setting Up Your Development Environment
- Creating the Solution and Projects
- Building the Individual Microservices
- Implementing Communication Between Microservices
- Managing Data with Databases
- Securing Your Microservices
- Testing and Debugging
- Deploying Your Application
- Conclusion
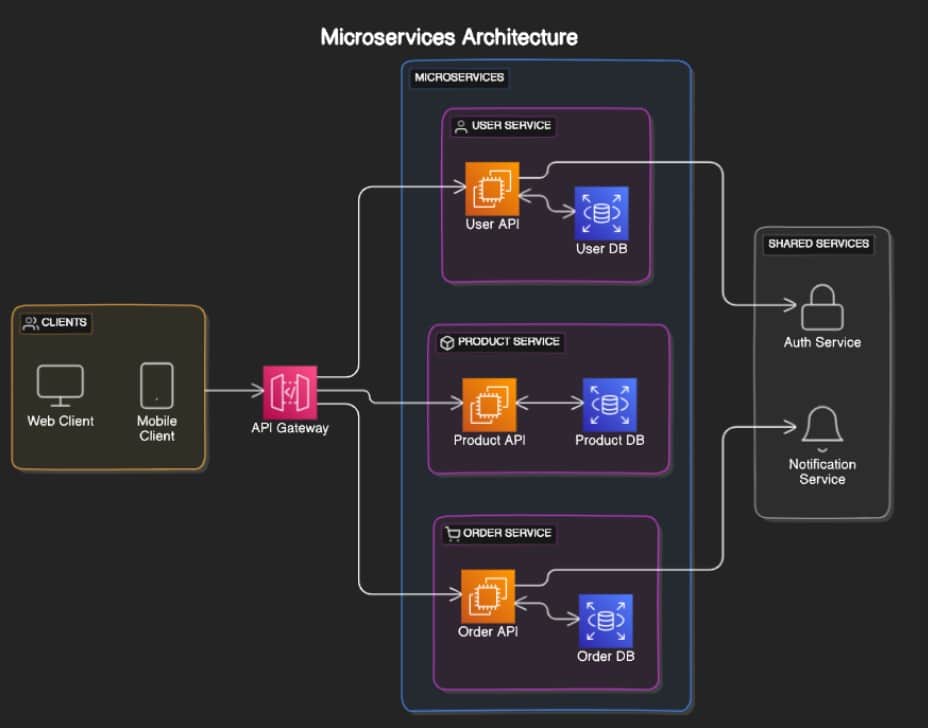
1. Introduction to Microservices Architecture
Microservices architecture involves breaking down an application into small, independent services that can be developed, deployed, and scaled independently. This approach offers several benefits, including improved scalability, flexibility, and ease of maintenance.
2. Setting Up Your Development Environment
Before we start, make sure you have the following installed:
- .NET Core SDK
- Visual Studio or Visual Studio Code
- Docker (for containerization)
- Postman (for API testing)
3. Creating the Solution and Projects
Create a new solution and multiple projects within it, each representing a microservice. Open your terminal or command prompt and follow these steps:
mkdir MicroservicesApp
cd MicroservicesApp
dotnet new sln

dotnet new webapi -o ProductService
dotnet new webapi -o OrderService
dotnet new webapi -o CustomerService

dotnet sln add ProductService/ProductService.csproj
dotnet sln add OrderService/OrderService.csproj
dotnet sln add CustomerService/CustomerService.csproj
4. Building the Individual Microservices
Each microservice should have its own set of responsibilities. Here, we’ll create basic CRUD operations for the ProductService.
ProductService:
- Open
ProductService/ProductService.csprojin your preferred IDE. - Create a
Modelsfolder and add aProduct.csfile:
namespace ProductService.Models
{
    public class Product
    {
        public int Id { get; set; }
        public string Name { get; set; }
        public decimal Price { get; set; }
    }
}
- Create a
Controllersfolder and add aProductsController.csfile:
using Microsoft.AspNetCore.Mvc;
using ProductService.Models;
using System.Collections.Generic;

namespace ProductService.Controllers
{
    [ApiController]
    [Route("api/[controller]")]
    public class ProductsController : ControllerBase
    {
        private static List<Product> products = new List<Product>
        {
            new Product { Id = 1, Name = "Product1", Price = 10.0M },
            new Product { Id = 2, Name = "Product2", Price = 20.0M }
        };

        [HttpGet]
        public IEnumerable<Product> Get()
        {
            return products;
        }

        [HttpGet("{id}")]
        public ActionResult<Product> Get(int id)
        {
            var product = products.Find(p => p.Id == id);
            if (product == null)
            {
                return NotFound();
            }
            return product;
        }

        [HttpPost]
        public ActionResult<Product> Post(Product product)
        {
            product.Id = products.Count + 1;
            products.Add(product);
            return CreatedAtAction(nameof(Get), new { id = product.Id }, product);
        }

        [HttpPut("{id}")]
        public IActionResult Put(int id, Product product)
        {
            var existingProduct = products.Find(p => p.Id == id);
            if (existingProduct == null)
            {
                return NotFound();
            }
            existingProduct.Name = product.Name;
            existingProduct.Price = product.Price;
            return NoContent();
        }

        [HttpDelete("{id}")]
        public IActionResult Delete(int id)
        {
            var product = products.Find(p => p.Id == id);
            if (product == null)
            {
                return NotFound();
            }
            products.Remove(product);
            return NoContent();
        }
    }
}
5. Implementing Communication Between Microservices
Microservices communicate with each other via APIs. We can use HTTP clients or message brokers like RabbitMQ. Here, we’ll use HTTP communication.
Adding HttpClient to OrderService:
- Open
OrderService/OrderService.csproj. - Add the HttpClient service in
Startup.cs:
public void ConfigureServices(IServiceCollection services)
{
    services.AddControllers();
    services.AddHttpClient();
}
- Inject the HttpClient into your controller and use it to call the ProductService API.
using Microsoft.AspNetCore.Mvc;
using System.Net.Http;
using System.Threading.Tasks;

namespace OrderService.Controllers
{
    [ApiController]
    [Route("api/[controller]")]
    public class OrdersController : ControllerBase
    {
        private readonly HttpClient _httpClient;

        public OrdersController(HttpClient httpClient)
        {
            _httpClient = httpClient;
        }

        [HttpGet("product/{id}")]
        public async Task<IActionResult> GetProduct(int id)
        {
            var response = await _httpClient.GetAsync($"http://localhost:5000/api/products/{id}");
            if (response.IsSuccessStatusCode)
            {
                var product = await response.Content.ReadAsStringAsync();
                return Ok(product);
            }
            return NotFound();
        }
    }
}
6. Managing Data with Databases
Each microservice can have its own database to ensure decoupling and scalability. Use Entity Framework Core for data management.
Configuring ProductService with EF Core:
- Add the necessary NuGet packages:
dotnet add package Microsoft.EntityFrameworkCore
dotnet add package Microsoft.EntityFrameworkCore.SqlServer
dotnet add package Microsoft.EntityFrameworkCore.Tools
- Update
ProductService/Models/ProductContext.cs:
using Microsoft.EntityFrameworkCore;

namespace ProductService.Models
{
    public class ProductContext : DbContext
    {
        public ProductContext(DbContextOptions<ProductContext> options)
            : base(options)
        {
        }

        public DbSet<Product> Products { get; set; }
    }
}
- Configure the database connection in
Startup.cs:
public void ConfigureServices(IServiceCollection services)
{
    services.AddDbContext<ProductContext>(opt =>
       opt.UseSqlServer(Configuration.GetConnectionString("ProductConnection")));
    services.AddControllers();
}
- Add the connection string to
appsettings.json:
"ConnectionStrings": {
    "ProductConnection": "Server=your_server;Database=ProductDb;Trusted_Connection=True;MultipleActiveResultSets=true"
}
7. Securing Your Microservices
Use JWT (JSON Web Tokens) for authentication and authorization.
Adding Authentication to ProductService:
- Install the necessary NuGet package:
dotnet add package Microsoft.AspNetCore.Authentication.JwtBearer
- Configure JWT authentication in
Startup.cs:
public void ConfigureServices(IServiceCollection services)
{
    services.AddDbContext<ProductContext>(opt =>
       opt.UseSqlServer(Configuration.GetConnectionString("ProductConnection")));
    services.AddControllers();

    services.AddAuthentication(JwtBearerDefaults.AuthenticationScheme)
        .AddJwtBearer(options =>
        {
            options.TokenValidationParameters = new TokenValidationParameters
            {
                ValidateIssuer = true,
                ValidateAudience = true,
                ValidateLifetime = true,
                ValidateIssuerSigningKey = true,
                ValidIssuer = Configuration["Jwt:Issuer"],
                ValidAudience = Configuration["Jwt:Issuer"],
                IssuerSigningKey = new SymmetricSecurityKey(Encoding.UTF8.GetBytes(Configuration["Jwt:Key"]))
            };
        });
}
8. Testing and Debugging
Test your microservices using tools like Postman and ensure each service works independently and as part of the whole system.
9. Deploying Your Application
Containerize your microservices using Docker for easy deployment and scalability.
Dockerizing ProductService:
- Add a
Dockerfileto the ProductService project:
FROM mcr.microsoft.com/dotnet/aspnet:5.0 AS base
WORKDIR /app
EXPOSE 80

FROM mcr.microsoft.com/dotnet/sdk:5.0 AS build
WORKDIR /src
COPY ["ProductService/ProductService.csproj", "ProductService/"]
RUN dotnet restore "ProductService/ProductService.csproj"
COPY . .
WORKDIR "/src/ProductService"
RUN dotnet build "ProductService.csproj" -c Release -o /app/build

FROM build AS publish
RUN dotnet publish "ProductService.csproj" -c Release -o /app/publish

FROM base AS final
WORKDIR /app
COPY --from=publish /app/publish .
ENTRYPOINT ["dotnet", "ProductService.dll"]
- Build and run the Docker image:
docker build -t productservice .
docker run -d -p 8080:80 --name productservice productservice
10. Conclusion
Developing an application using the microservices architecture pattern in .NET Core involves creating independent services, enabling communication between them, managing data, securing the services, and deploying them efficiently. This approach enhances scalability, maintainability, and flexibility.
By following this tutorial, you now have a solid foundation for building your own microservices-based applications in .NET Core. Keep exploring and experimenting to fully leverage the power of microservices architecture.